Op4guy Designs is the precursor to Op4guy.com which will be launching shortly and will focus on hard use gear and equipment used by professionals around the globe . Op4guy is mission focused on equipment evaluation,testing and consulting (E-ETC). Over the course of my career I have seen many tactical products used by thousands of Soldiers-some good and some not so good. My goal as an E-ETC is to help give insight and bias reviews of equipment, gear and clothing used by today's Soldiers and modern shooters.

Wednesday, October 5, 2011

MultiTasker Tools: Not Your Average Helping Hand


Ask any mechanic and they will tell you for certain jobs require specific tools and when it comes to being able to work on firearms there is no exception. The multi-tool may not be a new invention and one could argue the modern pioneer is the Swiss Army knife. However, it is designed for fixing small things and aiding in day to day tasks or even light survival skills. In the early 1980’s, Leatherman developed the next generation of multi-tools by integrating a more robust line of tools that offered pliers in addition to the normal compliment of blades and screwdriver tips. Their innovation ignited an industry that strived to make a great tool to suit a wide variety of users.


I still remember my first multi-tool which was a Gerber. While conducting a training mission I was MEDIVACED and my Gerber was dropped on a no-name mountain top deep that I doubt any man has visited since-I’m willing to bet it is still there to this day. Though some of these tools were good, they still lacked the specific functions needed to problem solve modern weapons and most were made of sub-par materials that did not hold up to well to abuse. If you look at most tools out there today you will find a ‘Made in China’ stamp on them and they will give up the ghost long before they complete the project you are using them on.

In 2008, MultiTasker tools were born. This was something totally different from any other tool currently available as they were designed for a specific group of people to perform specific jobs. Designed to help service the AR series rifle, the MultiTasker broke all of the rules by bringing mission critical tools that would help a shooter out when he needed it the most. Each of the three models were thought out and designed to serve on different levels from quick field use to heavy duty armorer use. They were designed to specifically to work on the AR Carbine family of weapons and called for a level of quality that rivals even the pickiest of tool aficionados tastes. With key features like quick change drive bit heads and dual-feature tools, MultiTasker aimed at providing the best tool a shooter could have in the most compact package available.

The AR-15 Series 2:

When it comes to a heavy hitter tool, I dare you to find one with more heft than this one. The AR-15 Series 2 is built much like a traditional style multi-tool with its butterfly opening body and needle-nose pliers head but that is where the similarities end. The body is made from stainless steel that has been oxidized in a matte black, skinned with G-10 non-slip grip panels, held together with heavy duty hardware and sports a lanyard tie-down port. The pliers feature a wire cutter and are made of CNC billet D2 tool steel-that is how you build a multi-tool!

Stowed in the handles are 7 tools: a ¼” hex drive with magnet retention and pre-loaded with a 4 point front sight tool, dental pick attachment, carbon scraper, 440c tanto knife blade, 3/8” wrench, file w/ flat blade screwdriver tip and a butt stock wrench. The formed, heavy duty black Cordura carry case features a snap closure and has the ability to adapt to a variety of different belt sizes as well as attaching to standard MOLLE webbing. Securely stowed inside the case with an elastic retainer you will find a 10 piece bit kit that includes common sized flat and Phillip head screw drivers, Hex heads and even two Torx bits.

Though it is a large tool, it’s not so big that it takes up too much space on a belt or looks out of place. Mine lives in my range box and every time I need to work on something at the range, it is the first tool I reach for because it will get jobs done in one neat little package. If the guys at MultiTasker can somehow figure a way to efficiently get a hammer in there, they have developed the perfect tool.
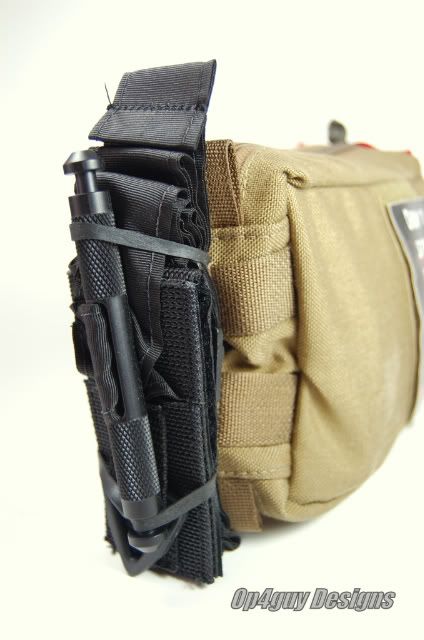
The Ultralight:

The Ultralight is by far my favorite of the three. It falls in that middle ground where it can do most of the things its big brother can while still being a compact and lightweight tool. I look at this tool and see something that was designed to be able to take all the abuse of the Series 2 yet be efficient like the Tube. The body is made of high quality stainless steel and covered with same style grippy G10 panels and sports a very generous tie-down loop and pocket clip. Folded up inside is its 4 tools: a carbon scraper, dental tool, ¼” magnetic driver socket pre-loaded with 4 point sight tool and a mini butt stock wrench. The Ultralight comes with the same 10 driver bits as its big brother and it is all packed in a black belt sheath that is about the size of a double stack magazine pouch.

Where the Ultralight really shines is in its ability to be utilized quickly. The Velcro closure on the sheath and thumb assist on each of the tools makes deploying the Ultralight an efficient and simple one handed operation. During a carbine course with LMS Defense, I carried this tool on my belt and it was worth its weight when it came down to clearing malfunctions that required me to get leverage on the bolt in order to even make it move. Using the scraper tool you can hook the bolt carrier and pull back or pry forward to give you that needed oomph to get the job done quickly.

The MultiTasker Tube:

Weighing in at under 2 ounces, the Tube is definitely the lightweight of the three. Its minimalist design that is about the size of a pen allows you to easily carry a custom loaded tool with exactly what you may need while having all the additional attachments offered in the Expansion Kit at the ready in your GO bag. The body is made of durable aluminum and features a fluted center section to give you a solid grip even in cold and wet conditions. The pocket clip is made from steel and the tip actually doubles as a 3/16” flat tip screw driver. The cap also sports a pivot pin/ takedown pin punch.

Unscrew the top cap you will find the same ¼” magnetic Hex drive socket with a 4 point sight adjustment tool just like the Tube’s big brothers. The sleek design of the Tube allows for great reach extension into tight places while still allowing you the freedom of movement to apply torque without having to rearrange the tool every half turn. Simply pre-load the socket with your most utilized bit and you are ready to rock.

Underneath the lower cap, you have a hardened steel scraper. Like the Tube’s big brother, its main function is to scrape away stubborn carbon deposits but the function I like best about it is it can also assist in pulling back the bolt on a jammed up carbine as well. If your gun goes down during a fight, you have the rest of your life to get it up and running and having that extra pull might just mean the difference in going home to enjoy dinner with your family or getting stuffed in a body bag.

Overall the MultiTasker is a great addition to the toolbox. The only changes I would like to see is different color options for the G10 handle inserts and carry cases and an extension for the ¼” drive. You can find DeWalt drive extensions for under $7 at your local home improvement stores.

The prices range from $39.95 for the Tube to $75 for the Ultralight and up to $104 for the AR-15 Series 2 and are available by direct order through MultiTasker or through Brownells. MultiTasker also warranties their product for life. If it fails due poor craftsmanship or materials they have your back and will see to it that you are well taken care of. With their three different models, you will be hard pressed to find a multi-tool that offers as much as the MultiTasker line up when it comes to value and versatility. For more information you can contact MultiTasker via email at: info@multitaskertools.com or visit them on Facebook and be sure to let them know we sent you.

Sunday, May 15, 2011

RKSTKR Down Med Kit


Today’s professionals push themselves when it comes to winning a gun fight. Many invest countless hours and thousands of dollars attending training courses put on by professionals training academies on how to shoot move and communicate but that is usually where the training stops for most people. Is it a good thing to know how to win in a gun fight? Sure, what about after the fight is over; what is the logical next step? Law Enforcement and military move right into the Secure and Assess phase and most times this is going to involve trauma aid for victims regardless of what side they were on in during the fight.


In emergency medicine, the golden hour refers to a time period lasting from a few minutes to several hours following traumatic injury being sustained by a casualty, during which there is the highest likelihood that prompt medical treatment will prevent death. Most times this treatment is not done by doctors in a hospital but by first responders like EMTs or combat medics. Though the military has long since had an approach which is where it teaches Soldiers life saving first aid through training and making sure every Soldier carries an Individual First Aid Kit, commonly called an IFAK.
Companies like RSKTKR Medical have developed their own version of the IFAK. Justin R., the CEO of RSKTKR Medical, looked at the basics of trauma medicine first and planned the RSKTKR Down kit accordingly. There are three priorities when it comes to combat casualty care: Airway, Pulse, and Bleeding. Without these three things, the human body just doesn’t work. So it’s no surprise when you open up the kit you find the following materials:
• HALO Chest Seal
• Quickclot ACS
• OALES bandage
• SOFT-T Tourniquet
• NPA
• Nitrile gloves
• Casualty Card


On the Outside.
All of these items are closed up in a clam-shell pouch that is available in several colors like Multicam, coyote, and black. Built by ZULU Nylon Gear, the carrier was made to RSKTKRs specifications using high quality nylon, tough YKK zippers, and industrial grade stitching that will take abuse dished out by the military and law enforcement community it was designed for. The carrier is extremely well thought out with its back covered in MOLLE webbing for attaching to an assault pack, body armor or any other piece of gear with PALS webbing. The front Velcro panel allows for the attachment of an identification patch and a bright red lanyard that can be used left or right handed for quick deployment of the kit. The design of the inner pockets is such that when the kit is opened, both pocket openings are facing up so the contents of the kit don’t spill out on the ground and become contaminated.

What’s Each Item For?
The OALES bandage contained in the kit goes one step above the standard Israeli or “Izzy” bandage. It offers a pressure dressing but also the ability to treat a second wound with the extra gauze and even sucking chest wound with the included occlusive material. In addition to these uses, the bandage also has Velcro impregnated into the roll itself to facilitate closure and prevent it from rolling uncontrollably.


With a plethora of hemostatic agents on the market, settling on just one can be rather difficult. The tried and true products of Z-Medica have a long history with public safety and the military and this was what helped influence the decision to go with the Quickclot ACS. The sponge is very effective it getting as close to the wound as possible without being messy or too rigid. Though earlier versions of Quickclot transmitted a lot of heat when used, the newer products produced by Z-Medica do not which makes it a much safer product to use on a casualty.

Halo Chest Seal is the best on the market. Used by medical professionals around the world it has gained a winning reputation its hydrostatic gel which is some of the strongest securing since the time of using the old defib pads. In addition to the securing properties, inside each package there are two seals to treat separate wounds. The entire HALO package can roll or fold up nicely making it very compact for separate storage in any small pouch or pocket.


The SOFT-T is one of the most reliable and strongest tourniquets on the market. Made of the highest quality of materials-including an aluminum windless for bleeding control-it is a key piece of equipment that can save not just an arm or leg but a life. Though the Gen 1 Down kit has the SOF-T attached with heavy duty retainer bands, the Gen 2 kit has it attached to the face of the kit in a very secure elastic sleeve that will ensure that the tourniquet is ready if you ever need it.


The included face shield is one item that many companies do not put in an IFAK kit. Justin from has a very simple reason for including in the RSKTKR down kit: “CPR is important-simple as that. By providing a mask, we feel that this may take out the hesitation that we have found individuals to have. This is not only the case with the lay person but also the rescuer. With heart disease being prevalent in public safety, having this may prove important and be the difference between saving a life and watching as one slips away”. This same logic is also applied to the included set of Nitrile gloves that help protect the user from bloodborne pathogens.

The nasopharyngeal airway, also known as an NPA- is designed to be inserted into the nasal passageway to secure an open airway. This simple little device is responsible for saving countless lives by ensuring that a casualty can breathe. As we all know, without breath there is no life.

The last item is the RSKTKR Casualty Card that is specifically laid out to make information fall in a logic sense when writing down patient information. The card layout was designed by Justin to keep patient and treatment information readily available for reference to any medical facility that will receive the casualty. The card itself is plastic coated to prevent it from being rendered unreadable due to rain or even blood.


The items in the RSKTKR Down kit have the potential to save a life but without proper training they can be useless. That is why RSKTKR Medical not only develops IFAK kits but also conduct trauma training courses ranging from simple adult CPR to their Gunfighter First-Aid course which offers specific training geared towards combat injuries. So as you are mapping your own personal training plan, don’t just plan for a class on how to fight but think forward about what will come after the fight. Get the right equipment like the RSKTKR Down kit and seek training on how to properly employ it. A gun fight isn’t just about the life you take; it’s also about the life you save.

Check out the RSKTKR by visiting them by clicking their logo or email Justin at: justin@rsktkrmed.com


Friday, January 14, 2011

Part Two: Battle Arms 45* Short Throw (ST) Ambidextrous Selector


By: Bryan Reed

In this second part of the three part series we are looking at the Battle Arms Development 45* Short Throw Selector (ST) selector system. Last month we covered the BAD A.S.S. system which allows ambidextrous manipulation of the fire controls on any AR-15 or AR-10 series rifle. The unique design of the BA selector systems allows you to customize which levers you use on your carbine to best suit you as an individual shooter.

This time we installed the BAD 45* ST on my LMT carbine and right out of the package you will find the precise machining and quality that you would expect from a manufacturer like Battle Arms. Just like their other selector systems, the 45 ST is made from 12L14 solid bar stock steel and comes with a new KNS Precision detent, two levers in your choice of length, and a Torx wrench. However, the 45* ST has one particular feature you will not find on the rest of their selector groups- a stainless steel pin approximately 2mm x 2mm that protrudes from the assembly itself.


What does a 45* Short Throw selector do?
The advantage of a 45* ST selector installed on a lower receiver is that the selector lever only has to move half of what it normally would in order to go from Safe to Fire. This results in a faster, smoother manipulation of the fire controls and less wasted movement. Take your own rifle and see how your thumb actually can have to move in two separate directions in order to place the rifle on Fire (down then forward). On the 45* ST it only takes a smaller push downward to get the level to go to fire. Coupled with their short levers that are grooved for grip it makes it very fast, smooth and positive when going from Safe to Fire. Ultimately this means that as the shooter you have the ability to be faster on the trigger and when you are in a gun fight for your life, there is no prize for second place.


What is the purpose of the steel pin?
The steel pin serves a unique purpose- it prevents you from installing it on a standard lower receiver. A typical lower receiver is marked with the Safe position at the 9 o’clock and the Fire position at the 12 o’clock. The Safe position remains in the same location but since the 45* ST selectors’ Fire position is a short throw it falls between the 10 and 11 o’clock position, it would not actually point to Fire, thus someone could be led to believe that the rifle is malfunctioning or on Safe and ultimately have a negligent discharge. Now, knowing that Rule #1 applies (Keep your finger off the F*$&ing Trigger!), not all people will get or understand it aside from the owner. So by adding the steel pin, it makes the 45* ST selector non-compatible with a standard receiver without modification. Here is the good news: Rainier Arms will soon be releasing a lower receiver that has the properly placed fire control markings and the relief hole for the steel pin on the 45* ST as well as some other very unique features. For more information about the lower receiver you can contact Battle Arms Development or Rainier Arms for more information.


Installing the 45* ST:
The installation of the 45* ST is almost exactly the same as installing a BAD A.S.S. selector kit. The only difference is you will have to figure out how you want to work around the steel pin. Remember, prior to installing this selector or performing any other work on your rifle; ensure that the rifle is unloaded and safe. If you do not have the tools or skills required to perform the job properly I highly suggest taking the rifle to a qualified and reputable gunsmith to conduct the installation.

Step #1- Start by removing the upper receiver and placing it off to the side. Then remove the bolt that holds the pistol grip by going through the bottom of the grip itself. This typically requires a flat head screwdriver or hex wrench.

Step#2- After you have removed the pistol grip bolt, slowly remove the grip. Be careful not to lose the detent spring as this will be needed to reassemble the selector. Once complete, the old detent pin can be discarded or retained as a spare (I recommend you keep it as a spare as you never know when you may need it).

Step#3- Remove the stock selector lever and either discard or retain as a spare. Note: The lower must be in the hammer back (ready to fire) position in order to remove the selector lever.


Step#4- Here is where you will have to make a choice as you can see the 45 ST will not go into the lower due to the steel pin. You have to now make a decision on which method you want to use to allow the 45 ST to fit.

Option #1: Using a small file or metal jigsaw blade, cut a relief hole in your lower receiver at the 12 o’clock position. Remember to go slow and only make the relief cut big enough for the pin to slide through. Check it after every few swipes with the blade or file to see if the pin will pass though the hole.

Option#2: Using a file or Dremel Tool, grind down the steel pin flush with the rest of the selector assembly body. Again, go slow and check for fit often only taking away as much material as needed.

Though I am not against modifying my lower receiver if I have to, I chose to remove the steel pin by using a Dremel tool fitted with a cone shaped grinding stone. However take note; according to Battle Arm’s web site, any modification of the assembly (like grinding away the pin) will null and void the warranty of the 45* ST. With the Dremel it took less than 1 minute to completely grind away the pin and allow for unimpeded installation of the selector body into the lower receiver. Here is the process that I chose to use.

Remove both selector levers from the assembly and secure the assembly in a bench vice or using vice grips or clamps to keep it from moving while performing the modification. I also used an old t-shirt to help protect the assembly from being marked by the vice. Remember don’t tighten the vice down so much that it distorts the assembly. Just tighten it enough to secure the assembly during the grinding process.


Step#5- Once you have completed removing the pin or cutting a relief hole, install one lever on the left side of the assembly (opposite side of where the detent holes are made) and insert the 45* ST assembly from left to right. Turn rifle over and install the selector lever on the right side and swivel the lever assembly to make sure it moves freely with no binding and then place in the selector in the Safe position.

Step#6- Insert the KNS detent pin into the hole on the underside of the receiver, install the detent spring and reinstall the pistol grip.

Once you have completed this you are done with the installation. Reinstall the upper receiver and perform a functions check to make sure the rifle will operate correctly. If you have other sized levers in your kit you can experiment with using different sizes and lengths to customize your selector setup. Once you have found your desired setup I highly recommend you remove the levers one at a time and use non-permanent Loc-Tite to secure the retaining screws.

Some shooters have found that it may take a little more pressure to manipulate the fire controls. If you find this is the case for you then you can cut one or two coils off the detent spring to lessen the pressure on the KNS detent itself. I would not recommend this until after you have cycled the selector assembly at least several dozen times as it does smooth out some with use (mine took about 20 manipulations).

So is it the 45* ST for everyone?
In the end the Battle Arms 45 ST really delivers with its smooth operation and robust design and has a very positive and solid feel compared to a standard selector assembly. The levers tactile grip will help whether your hands are cold and wet from being out in the elements, slick from sweat, blood or mud or even while wearing gloves. I find I can simply push down on the Short Throw levers from either side and get a very positive ‘click’ as it locks down into the fire position with no wasted movement or mushy feeling on the controls. The whole system is simple to install and can be done in less than 30 minutes even with the modification to remove the pin. Top that off with the fact that it is ambidextrous which provides universal controls for shooting left or right handed. So if you are looking for a high quality, rock solid ambidextrous selector system in a unique, fast functioning short throw setup, check out the Battle Arms Development 45* Short Throw Selector.


Rainier Arms is also an authorized distributor for Battle Arms Development