Op4guy Designs is the precursor to Op4guy.com which will be launching shortly and will focus on hard use gear and equipment used by professionals around the globe . Op4guy is mission focused on equipment evaluation,testing and consulting (E-ETC). Over the course of my career I have seen many tactical products used by thousands of Soldiers-some good and some not so good. My goal as an E-ETC is to help give insight and bias reviews of equipment, gear and clothing used by today's Soldiers and modern shooters.
The AR-15 platform has seen many revolutionary products emerge over the last 10 years ranging from simple alternative buttstocks to gas piston upper receivers. Though, of all of the enhancements that can be added, shooters have strived to find the right equipment to make their carbines as ambidextrous as possible. The ability to efficiently operate a carbine both right and left handed has been the primary goal and one of the easiest ways to achieve this is by swapping the fire control selector lever to one that offers controls on both sides.Over the next few months we will also be installing the Battle Arms 45* Short Throw and CASS 3-P selector sets so keep checking back for updates.
Earlier this year, Battle Arms Development released their Battle Arms Development Ambidextrous Safety Selector – or BAD-A.S.S. for short- that will fit both the AR-15 and the AR-10. Precision machined from a solid piece of 12L14 bar stock steel and finished in a coating of matte black manganese phosphate, the BAD-ASS differs from other ambidextrous selectors as it allows the user to choose the selector lever size and style that fits their own personal preferences. The BAD-ASS also has the unique ability to allow the user to switch levers without removing the entire selector by simply removing the set screws that hold the lever in place. The levers are actually keyed to the selector, so there is no way for the lever to rotate on the selector once installed without moving the selector itself.
The BAD-ASS kit includes the selector, selector detent (from KNS Precision), a T-10 torx wrench for installation, selector retainer screws, and three selector levers; Standard, Short and Thin. Each of the selector levers has diagonal grooves on the thumb contact sides, cleanly machined and rounded edges, and a groove down the center of the selector so you can paint it for easy recognition as to what position the selector lever is in. This is how I received my BAD-ASS kit from Battle Arms:
Installation is very simple and the kit comes with printed instructions included in the package.
1-Start by removing your existing grip
2-Remove your existing selector and detent
3-Remove right-side lever from BAD-ASS and install
4-Install right-side lever and new selector detent
5-Re-install existing grip
6-Perform a functions check to ensure that the fire controls are working correctly.
Once you have the BAD-ASS is installed, you can try the different selector lever combinations to see which set up works best for you. Most people prefer having a full size selector lever on their strong side as they want to get as much purchase on the lever as possible(typically for a right handed shooter this means it is on the left side). When it comes to the support side of the carbine, some may prefer a shorter lever where as others may like the full length thin lever-it’s your chance to mix and match! Once you have found your combination, simply reinstall the screws and you are ready to rock.
Note: Non-permanent (blue) thread locker is recommended to secure the selector levers after the user has chosen the options they want.
Currently, I have the BAD-ASS on two different carbines and thus far, I have been impressed with the BAD-ASS. The selector feels much smoother than either the DPMS or Rock River selectors I was running previously running on two of my carbines and on par with a factory LMT selector I still have remaining on one. With the BAD-ASS, I can easily move the selector lever to safe with the knuckle on the index finger of my right hand while maintaining my shooting grip. It also allows me to use my thumb to move the selector to fire when shooting left-handed. Battle Arms Development also offers other styled selector levers and even a blank end-cap for further customization.
Bottom line is if you are looking to run an ambidextrous safety selector on your carbine, check out the BAD-ASS from Battle Arms Development Inc. They make a quality product that is designed to not only last but also help make you and your carbine as efficient as possible.
More than ever we are seeing shooters look for ways to stretch their dollar and get as much trigger time as possible. Lets face it, if you can save hundreds of dollars in buying 5.56 ammo doesn't that mean that you can focus that money towards training? In theory yes, but what kind of reliability do you get running something like a Smith and Wesson M&P 15/22?
Will it run like as reliably as my LMT rifle when I am pulling that trigger 700+ times in a day under conditions that will make some airsoft kid curl up in a corner piss his pants and cry? Well we are going to find out. Over the next few months I am going to run this M&P 15/22 to see how well it will work as a training rifle.
Most everyone I talk to will tell you that a holster is nearly as important as the gun it will carry. So why do I see so many people who rely on a cheap $12 gun show special to carry their $800 pistol that they count on to save their life? It’s simple; they think that a cheap holster works just as well. Sure a cheap holster will work, but the bigger question is when will it stop working? We all know it will be when you need it the most. Of course a cheap holster is only one end of the spectrum- the other end is top of the line leather holsters hand crafted that can not only cost hundreds of dollars but can take months-even up to a year-to deliver.
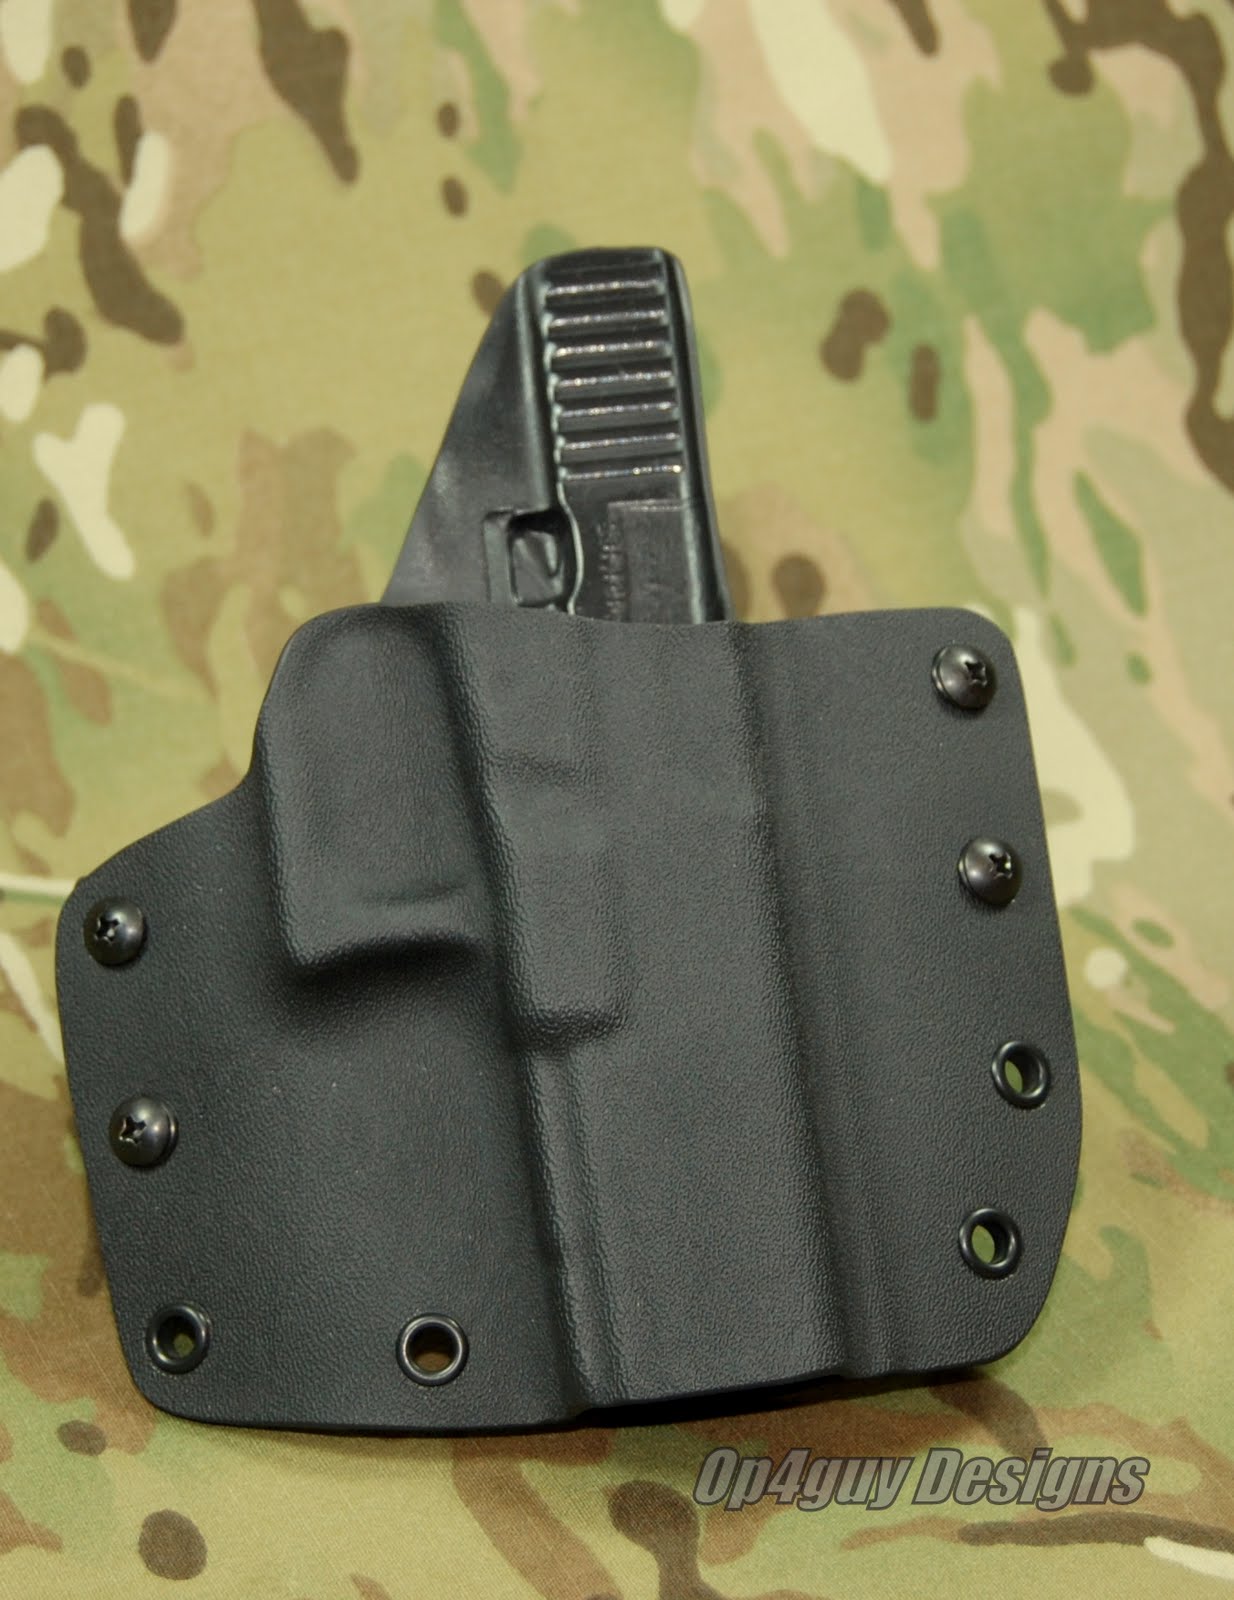
Falling in the middle are quality holsters made with durability and longevity in mind. There are many options out there,one of the newest ones being offered is the Kaluban Cloak by Eugene Yap at Calculated Sentience LLC of Murrieta CA.
Calculated Sentience is a Veteran owned business with its staff having served in the US military as well as defense contractors supporting parameters of OEF and OIF. Aside from their military background, the staff also has years of experience in general fabrication ranging from detailed handcrafted work to full automation with the use of robotic technology. Currently, they manufacture custom handcrafted Kydex holsters and accessories that are 100% made in the U.S.A.
The decision for Calculated Sentience to start making quality Kydex holsters was simple: due to the immense vacuum in the industry where the demand grossly exceeds supply, prices have been dramatically inflated, and there are long wait times for quality products. Their goals are simple: provide an outstanding product coupled with superior customer service at an affordable price, all in a timely manner. Eugene and the guys know what it is like to not only have to spend your own money to get good kit, but how time sensitive a delivery can be.
I sent my email inquiry to Eugene asking about a holster for my Glock 19 and I was told it was available for immediate shipment. I ordered an OWB Kaluban Cloak without light, 10 degree cant, and 1.75" belt in black on a Friday. The following Wednesday I had a nice little package delivered. To be honest I was surprised at how fast it arrived. Inside I found my holster neatly wrapped in bubble wrap to protect it during shipping and a copy of my invoice.
Just holding the Cloak you can tell it is well built. The Cloak is made from Kydex T that is .08 thick (.093 for Coyote) and formed to the gun. I'm not sure of the exact procedures used in the forming process but when you closely examine the holster and see how well it is formed you can tell this was not done in mamma's kitchen using the oven. The holster is actually made from two separate pieces of Kydex for the front and back then they are placed together and the edges are so well blended it almost appears like it was made with one split piece. The two halves are joined together tightly using grommets and locking screws. The locking screws also attach the belt loops which are also made from the same Kydex material and rolled into loops for your desired belt width (1.5", 1.75" or 2"). They are thick enough to not flex and keep the holster secure, yet not so big where they press into you uncomfortably when you cinch up your belt. The Cloak also can be configured with J hooks, C hooks, and Over-hooks as well as other commercially available soft loop options. It also features a full length sweat guard that extends to within 1/4" of the end of the slide and has nicely rounded and finished edges so it doesn't cut or dig into your side up.
As I dropped my Glock into the Cloak, I could not only hear it, but feel it lock securely in. The gun locks in tight with the trigger completely encompassed by the holster to protect it as well as no wiggle or loose feeling that I have experienced with other holsters. To get the gun out of the holster it takes a very positive pull. Some may find this to be bordering too tight but let’s face it; I would rather have to pull the gun a little harder than worry about it just falling out.
With the gun in the holster, you can see the Kaluban Cloak was designed with the thought that not everyone uses the same type of sights. Its over sized sight channel will give you plenty of room to clear most all front sights without worrying about hanging it up. The bottom is also left completely open to help avoid debris from becoming stuck inside the holster as well allowing you to use a threaded barrel or even longer model guns (i.e.: G17 in a G19 holster).
If I could only have one word for describing the Cloak while wearing it, it would be comfortable. For the last few years I have been using an IWB holster and even though my G19 is not a large pistol it still gets uncomfortable after a few hours of wearing it. The Cloak is the total opposite; as it seems the longer I wear it throughout the day, the less I notice it. The width of the belt loops and curved molding of the holster helps not only to distribute the load but it also keeps the holster in tighter to the body. Additionally, an IWB holster tends to ride lower when carried so you are almost limited to a 4-5 o'clock position carry (right handed) since other positions would either make the gun dig into your thigh in a sitting position or be very far behind your back. With the Cloak OWB, I find I can even carry in the 2-3 o'clock position so the gun can be positioned closer to my front. The holster does extend about 2.5" below the belt which is pretty typical for an OWB holster and easily concealed by a variety of clothing.
One of the best attributes about the Kaluban Cloak is its versatility to adapt to different clothing arrangements, environments or situations. Even in summer time when temperatures begin to rise, the Cloak will work well with simple shorts and your favorite Magnum P.I. Hawaiian shirt. Some people find a full length sweat guard to be bothersome and prefer a shorter version. Calculated Sentience does offer a cut down version of their sweat guard or you could easily do this yourself if you chose to. Obviously the Cloak will work well when wearing a simple jacket like a soft shell and afford you quick and easy access to it in a hurry. The Cloak is also well suited for use as a duty holster for the professional Law Enforcement community. It has a very professional look and will keep your service weapon close and secure. If you are in a tactical role, you can even use MOLLE-Lok clips to attach the Cloak to PALs equipped gear (only works with straight drop models).
Overall the Kaluban Cloak by Calculated Sentience is a damn good piece of kit for keeping your gun secure to you under a wide range of conditions. It comes in at an affordable price starting at $50 without light, good delivery time, great selection of guns, configurations and colors and above all, great customer service. So if you are looking for a good rig check them out atwww.calsentllc.com or by clicking their logo below to order yourself a Kaluban Cloak-you won't be disappointed.
Note: As of 17 November 2010, from date of order to delivery is about 3 weeks.
Last night a good friend and I went to the Grand Theatre in Tacoma WA to see the film Restrepo. I have wanted to see this film since I first learned about it nearly 8 months ago and I won't put any spoilers in here but I will say this-you need to see this film.
Restrepo follows the warriors of Battle Co, 503rd during their tour in the volatile Korengal Valley, Afghanistan and brings to life the highs and lows that Soldiers experience under combat conditions. Virtually cut off from the modern world and living in a dusty outpost at elevations that would make most Americans gasp for air, the men of Battle Company conduct daily operations against the insurgency.
On July 22, 2007 PFC Juan Restrepo was killed during combat operations in the Korengal. Shortly there after the men of Battle Company 1/503rd made a bold move to build an OP in the enemy's own front yard in order to disrupt their insurgency. With nothing more then the muscle of men and basic hand tools these warriors took the ground and built OP Restrepo under some of the harshest conditions imaginable.
This film is not just a tribute to PFC Restrepo and the men Battle Company. It is an eye-opening wake up call to everyone about how hard the American military fights and their daily sacrifices. Click the link below to visit Restrepo's official site or visit them on Facebook to find a theatre near you.
When you take Primary Weapon Systems and Troy Industries muzzle devices and put them head-to-head who do you think ends up top dog? Well we went for it and ended up with some pretty interesting results. Check back soon for the full report.
Update Oct 2, 2010: We are adding more brakes to the line up so this will be a little longer but I promise it will be worth the wait.
The following is an article on how to paint a carbine by Pat Rogers of EAG Tactical. Pat Rogers is a a retired Marine Corp Chief Warrant Officer as well as a retired NYPD Sergeant with a wide and varied background in the CT Community.
Since 1992, Pat has been running EAG Tactical and is one of the most respected tactical trainers in the business. When it comes to a practical no BS approach to training and shooting, there are very few that can hold a candle to Pat and EAG Tactical.
Painting a Carbine.
We get a lot of questions about this, and we see a lot of people who spend a lot of money to have their carbine painted. The reason for painting is to make the gun less visible. Black is the absolute worst color for a gun. It makes the gun more visible in both day or night. A single earth tone color will partially accomplish this. Blending several of these colors together is better still. Spending a lot of money for decals that replicate patterns (digital or otherwise) are expensive and certainly make the gun pretty however, they may not provide better camouflage than other methods.
Our priorities are: Make the gun less visible Minimal amount of time with the gun out of service Minimal cost Easy to retouch
We use only Aervoe paint. We find the Aervoe to be more true to color specs and be more durable. Aervoe is available at some of the larger gun supply sites. If you do not have access to Aervoe use whatever matte colors you can lay hands on.
Prep:
Ignore PEO Soldier- Painting Your Rifle 101. They were smoking crack when they wrote this. Use SLiP2000 725 cleaner or whatever cleaner you normally use (eg Simple Green etc). If the gun is heavily lubed wipe up the excess inside the upper and lower receivers- this will leak out and cause paint not to adhere. -Stuff some paper towel in the flash suppressor. -Put the lens covers on the optic. -If you have a white light on the gun, tape the lens and any rubber (push button, tape switch. -Remove anything you don’t want painted.
Hint: the paint dries faster if the gun is warm. We use sunlight to accomplish that.
Use Aervoe 977 Sand (30277) or other light color tan or khaki for your base coat. Mist the gun with this paint. Use broad strokes to lightly cover the entire gun. Repeat with one or two more light coats. Don’t look for 100% coverage and don’t use heavy coats of paint. Painting the exterior of the barrel will not hurt anything. It will not burn off under normal or even hard use.
I use a small strip of camo net as a mask. If not available, you can cut small holes in an old sheet or paper. -Place the camo net over the gun and shoot a light coat of a brown through the net, I use Aervoe 480 Highland, but any similar color will do. -Don’t shoot through every hole, and don’t try to cover every square inch of the gun.
Apply the net in a different location and shoot it with Aervoe Marine Corps Green (34052) This is a very dark green.
Apply the net in a different location and shoot it with Aervoe 932 Dark Green (34102)
Once finished, take a can of Aervoe 987B Olive Drab 34088 and lightly over-spray the entire gun. Use long, full power strokes from approximately from about 18”.
The purpose here is to blend the other colors together.
If available, overspray with a Matte Clear spray. These are generally hard to come by in Matte. Again, misting will give a flatter finish. Heavy coats will leave a shiny finish.
The entire job- minus prep and drying after the Matte Clear Coat- should take no longer than 20 minutes.
The gun should be shootable within an hour. If you have the ability to leave it in the hot sun to dry for several hours, so much the better.
We have taken guns out and shot them within an hour of painting.
If you are lacking time or a variety of colors, use Sand for a base coat and Olive Drab for splotches and over-spray. Brownish colors work almost everywhere (how many green animals have you seen?)
#31 is a little over a year old and has 13,000 rds downrange.
Thanks again to Pat Rogers of EAG Tactical for allowing me to use such an excellent write up and how-to. Click the EAG banner at either the top or bottom of this page to vist EAG and learn more about Pat and training with EAG Tactical.
On the evening of December 21, 2009 Pierce County Sheriff’s Deputies Kent Mundell and Sergeant Nick Hausner responded to a domestic violence call in Eatonville WA. The report stated that a man, David Crable, was fighting with his daughter and brother. After entering the home, the Deputies convinced the intoxicated man to leave the house when he produced a previously concealed gun and fired ten rounds at the officers.
Both Mundell and Hausner were hit but despite being wounded, Deputy Mundell managed to remain focused, return fire and killed Crable. The suspect's brother and daughter even put themselves at risk to pull help the wounded Hausner out of the line of fire by pulling him into another room.
Deputy Mundell was airlifted to Harborview Medical Center in Seattle, where he remained on life support in the intensive care unit for the next seven days. On December 28th, 2009 with his wife and other family and close friends by his side, Kent Mundell passed on. He left behind his loving wife, two children and many other grieving family friends and colleagues.
While still reeling from the loss of another Officer here in Washington, Kevin Williams a primary instructor of LMS Defense in Washington came up with an idea to help raise funds for the family but also to help train others to possibly avoid a situation like this in the future. With the LMS Defense training team on board Kevin started to organize the event for February 2010 and announcements went out to LE agencies, past LMS Alumni and across message boards like Lightfighter.netthat help connect many of these professionals from all across the globe.
Support poured in from all across the country in the form of monetary donations as well as raffle prizes in support of the memorial event. The typical course tuition for an event like this would be $190 but for this event, all the money that was collected went to the Kent Mundell Memorial Foundation. And with a class size of 26 and hundreds more offering support it’s no wonder that this one day even raised nearly $8,000 for the Mundell family.
On the cool early morning of 27 February, 2010, 22 shooters gathered at a shooting range nestled in the foothills of mount Rainer. But we all came together with one goal in mind and that was to honor Kent Mundell in a special way: Train hard.
Kevin started off the morning with introductions around the group which included Officers from many different departments, Firefighters, EMTs, Soldiers industry professionals and civilians. Some were SWAT, some had combat experience, others had real world trauma experience, previous tactical courses and experience contracting overseas in theatres like Iraq and Afghanistan.From there Kevin gave a range safety brief and then laid out how the course would unfold throughout the day. The training plan included:
-Pistol and rifle qualifications
-Shooting from standing, kneeling and prone to include barricade shooting
-Shooting while moving, box drills and the infamous Roadhouse Rules
You could tell after this course brief that the pace of the class was going to be fast and the bar set high to perform well.Not only did you want to shoot your best but Kevin said there would be certain events where there was some quality prizes being donated by some of the tactical industries most reputable names.
The training day began with pistol and rifle qualifications. For me being a .mil guy, shooting rifle from only as far as 100 meters and closer was a no brainer. Having done this for years with only iron sights was easy but doing it with a micro-dot on a well tuned LMT rifle made it very easy. I managed to hold my own pretty well and shoot accurately, smoothly and consistent.
Next up was the pistol qualification evolution. For me, I knew this would be more difficult since I have only seriously begun pistol training and drills over the last few years and never anything 50 meters out for record. I had confidence in my Glock 19 to keep me from looking like too much of an ass and after it complete, I scored well and was even told by a few of the LE guys that I did a lot better than many LE guys that have the chance to shoot this course monthly at a minimum.
After all the scores were tallied up Kevin brought out the first of the surprise prizes. A DB-L knife to each winner donated by the good folks at Strider knives. If you know anything about Strider knives you know they are top notch kit coveted by many as the hardest working knife out there and they are not cheap or easy to get.
Over the next few hours Kevin put us through many scenarios and drills including reloads, transitions, barricade shooting, multi-target and shooting on the moves. It seemed as we learned something we just kept adding another step and making it more advanced until the evolutions culminated with many shooters moving quickly, acting confidently and engaging with professional accuracy.
Being a lefty I do things differently than most when it comes to shooting. Not only is it the fact that I shoot rifle left handed but couple that with me shooting pistol right handed. Many have pointed out during training that this is a very odd way of shooting. The amazing part was there was not one, but two shooters in this class that also suffered from this ‘affliction’.One of them, a Pierce County SWAT guy who has been on the job for a long time and the other was Scott, a regular at many of the LMS Defense courses. It was nice to see that though we had never met before, we were all using the same technique with a subtle difference here and there due to body types and gear setup.
The morning flowed so well that everyone kept pushing to learn and shoot at an insatiable rate. Finally Kevin called a working lunch and everyone gathered under the overhead cover to eat some food, drink up, dry off and reload. Kevin used this time to start the raffle. There were donations from many great companies, gear makers and distributors. Probably the most coveted item that everybody wanted to win was a Primary Weapons System MK-1 series piston upper assembly.If you are not familiar with PWS then you really have no idea what you are missing. The good folks at PWS make some of the best weapons and accessories out there. Not only did they donate such an awesome item but two members of the PWS Team drove all the way from Idaho just to show their support and shoot with us and brought some nice little goodie bags for all in attendance. There were also gift certificates for training with the great Pat Rogers from EAG Tactical, a huge selection of gear from Tactical Tailor, holsters from Blade-Tech, knives from SOG and much, much more.
After the raffle and lunch wrapped up, we began the Tactical Trauma evolution. Kevin had reached out to his fire fighter brethren and arranged for two EMTs to give us this block of instructions. These guys were nothing short of professionally passionate about what they do. One of them has nearly 20 years on the job and the other is also a Special Forces medic who has seen combat operations in Iraq and Afghanistan.
This was not a full blown trauma course but rather a condensed block about saving your partners life. Most gunfight wounds have one major thing in common: blood loss due to extra holes in the body. This was all about being able to stop that bleeding and moving your partner to safety.From pressure bandages, to wound packing with Kerlix, to applying tourniquets-it was all expertly covered.Then the big surprise came out with the introduction of live tissue to apply everything learned.
In the final few hours of training we covered more shoot and move drills and malfunctions. Malfunction drills hold a special place in my heart as I feel this is a skill that everyone who makes a living behind the gun needs to not only know how to shoot but they need to be able to problem solve and fix their gun when it goes down. It was said to me once years ago and I say it often: If your gun goes down in a gun fight you have the rest of your life to get it working again.
Kevin teaches some very solid methods in getting your gun up and running to put get you back in the fight. It wasn’t just a show and tell either. The practical application part of this was the Blue Falcon drill where you set your partners gun up with a failure and then they have to work through the problem.Everyone really took a liking to this evolution since it gave you the chance to be creative and really mess with your partners head.
By the end of the day everybody was dirty, tired and a little wet from the occasional showers well known in the Pacific Northwest. More than 20,000 rounds had been expended and the ground literally glowed with a brass hue. After we assembled for a final class photo Kevin gave us some finals thanks for helping out the Mundell family and honoring his name and sacrifice. However we were only a small group of 22 that represented a much larger group from all over that helped make this event possible.
Thanks to the LMS Defense team and Kevin Williams for putting on such an event. Without their effort this event would never have happened. To all the vendors that donated so much: Primary Weapons Sytems, Pat Rogers of EAG Tactical, Strider knives, Blade-Tech, Magpul, LaRue Tactical, SOG Specialties,Tactical Tailor, SLiP 2000 and many others I know I am forgetting we all thank you. This was a great day spent training for a great cause.
The loss of Officers lost in the line of duty happens far too often in our country. Mindset, training and preparedness can give that much needed edge when it comes to being the Last Man Standing in a fight. Train hard, train often.


